Test code generation from Swagger and PlantUML with Azure OpenAI Service
Azure OpenAI Service を使って OpenAPI と PlantUML からテストコードを生成する
LLM (大規模言語モデル) を使ったコード生成の文脈において、「怠惰」で「短気」で「傲慢」な職業プログラマがまず到達したいのは、テストコードの自動生成と、そのすべてのテストケースをパスする実装コードの生成だと思います。
本記事ではテストコードの自動生成について、取り組みを紹介します。
本取り組みでは、テストコードを生成するためのプロンプトの一部として、OpenAPI 仕様 と PlantUML を使用します。
実装コードではなくまずテストコードの生成を試みる理由は、テスト駆動開発 のアプローチを取るためです。
もちろん我々がテストコードを書いて、それをもとに実装コードを生成するというアプローチもあると思いますが、それは別の取り組みとして検証・評価したいと思います。
ゴール
- Azure OpenAI Service を使ってドキュメントからテストコードを生成し、その内容を評価する。
免責
- 本記事の内容は、執筆時点のものです。LLM の変化やゆらぎもあるため、再現性は保証されません。
- 本記事の内容は検証レベルのものです。完全な手法に関する情報を提供するものではありません。
- 本記事で使用する PlantUML は、細部まで作り込んでいるわけではありません。細かい部分で間違いがある可能性があります。
- 本記事で使用されるプロンプトは、特に突き詰めてチューニングを行っているわけではありません。
準備
OpenAPI 仕様
本記事では OpenAPI 公式のサンプル “petstore-simple.json“ を使用します。
以下に転記します。
1 | { |
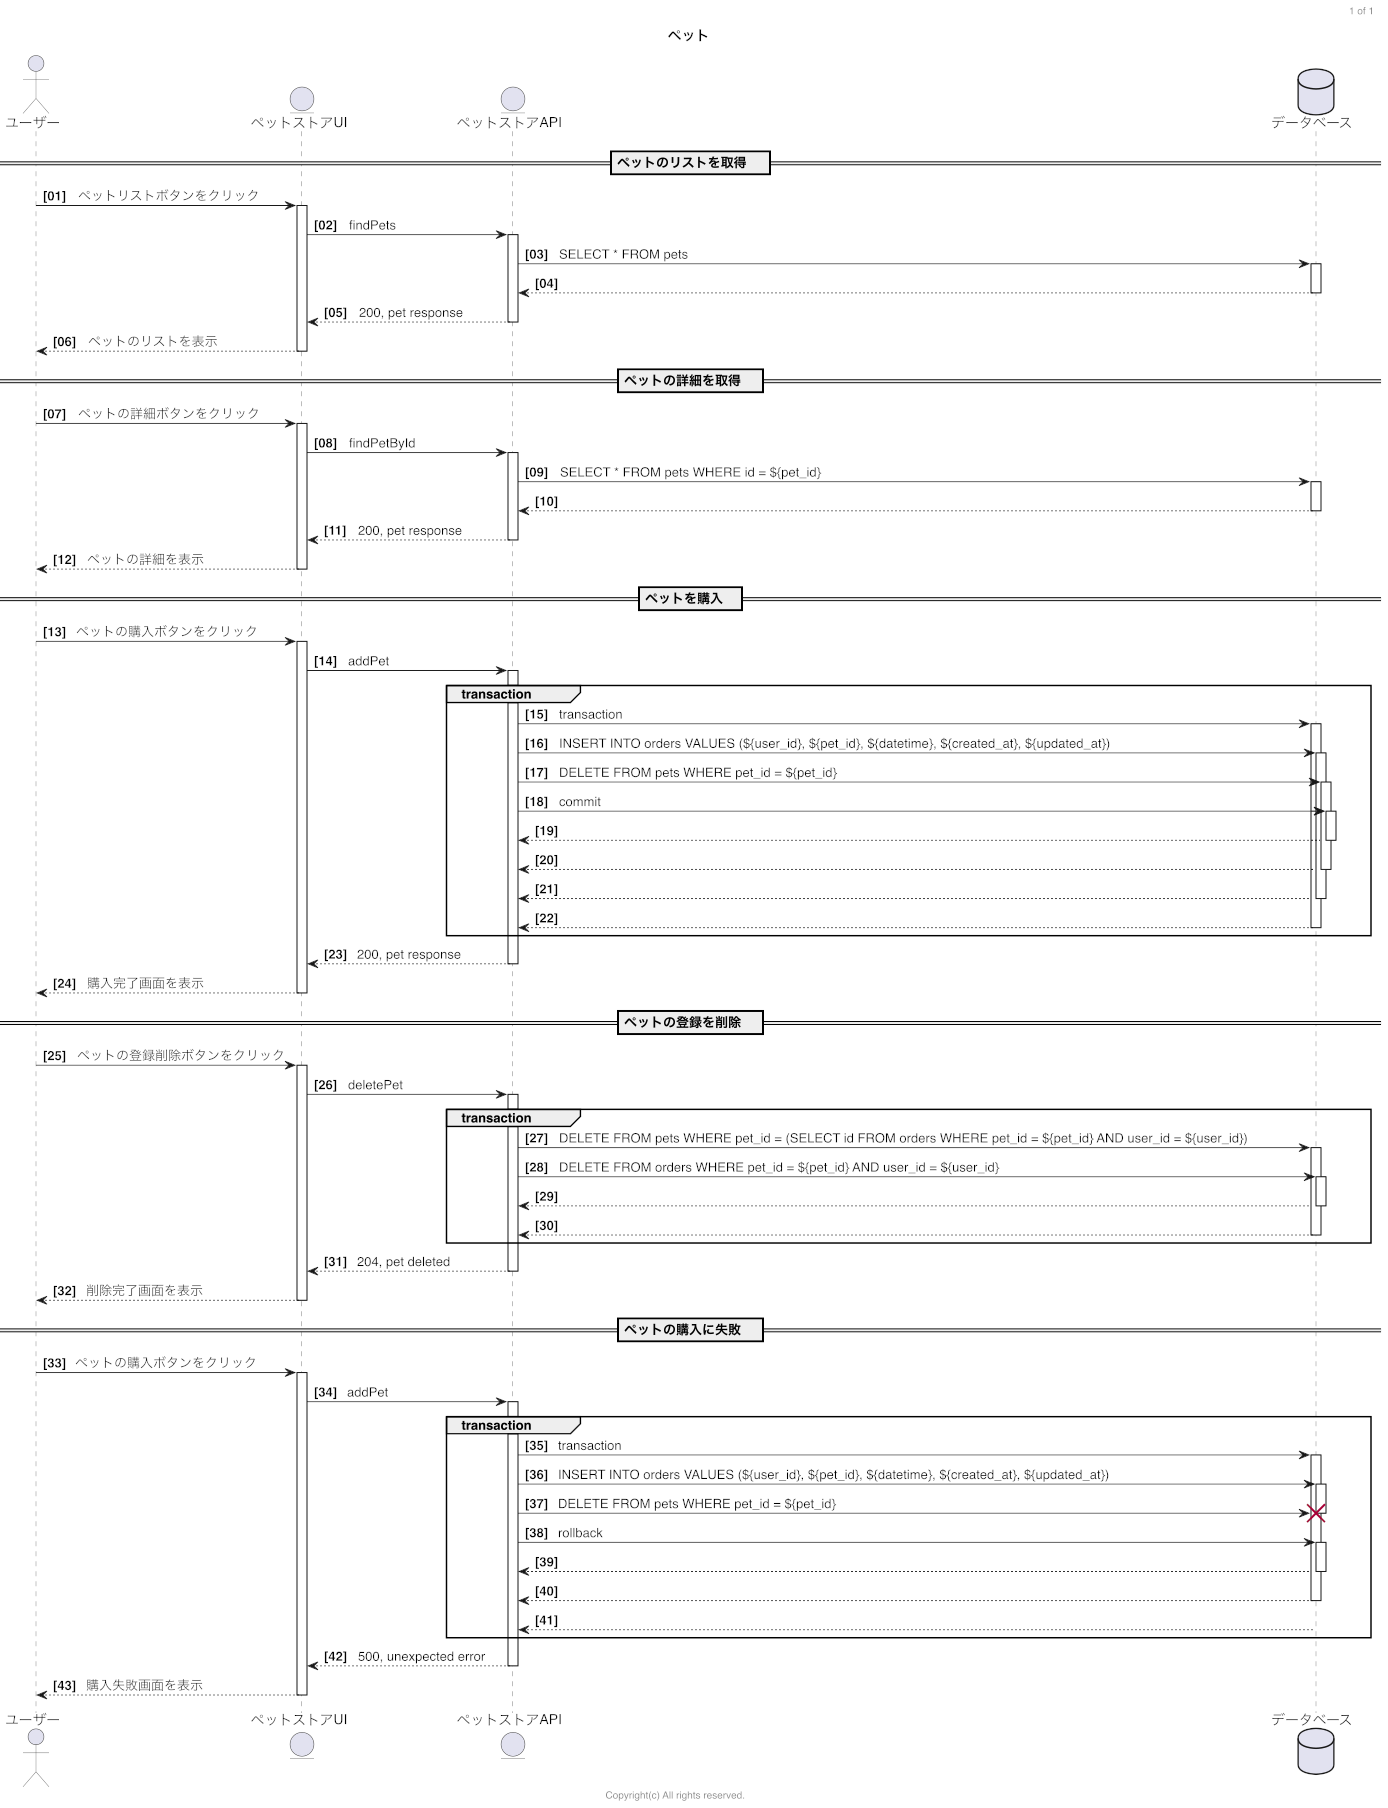
PlantUML のシーケンス図
上記の OpenAPI 仕様に基づき、簡単なシーケンス図を PlantUML で作成しました。
1 | @startuml |
シーケンス図の画像は以下の通りです。
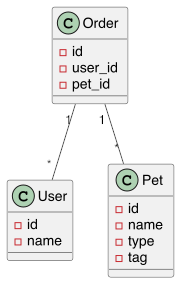
PlantUML のクラス図
同様に、今回使用する OpenAPI 仕様に基づき、PlantUML で簡単なクラス図を作成しました。
1 | @startuml |
クラス図の画像は以下の通りです。
プロンプト
プロンプトは以下の通りです。免責にある通り、チューニングは特にしていません。適当に作文したものです。
日本語でも良いのですが、意図がより正しく伝わるよう、英語で作文しています。
非常に長くなってしまうため、上記の 3点については、ここでは記述を省略しています。後で別途 # NOTE: ここに〜を入れる と書いてある箇所にコピペをして、プロンプトを完成させます。
なお、本記事では Python を指定しています。簡単な修正を行うことで他の言語にも対応可能です。
1 | /* |
参考までに、和訳を以下に掲載します。
1 | あなたはプロのプログラマーです。 |
モデル
本記事執筆時点では、以下のモデルが使用可能です。
- text-davinci-003
- code-davinci-002
- gpt-35-turbo
プロンプトの理解力とコード生成力のバランスから、基本的に text-davinci-003 を使用します。
入出力インターフェース
Azure OpenAI Service の Azure OpenAI Studio 内にある Playground を使用します。
実行手順
1. プロンプトを作成・入力する
上記のプロンプトを完成させ、Playground に貼り付けます。
2. Generate ボタンを押す
何も生成されなくなるまで、 Generate し続けます。
3. 生成されたコードを取得する
コピーしてエディタ等に貼り付けます。
4. プロンプトの修正と実行を繰り返す
Temperture がデフォルトでは 1 となっており、ゆらぎが大きいため、基本的には実行する度に異なる結果となります。
本記事ではあえて 1 のままにしています。
最良の結果が得られるまで繰り返し実行し、試行錯誤します。
結果
生成されたテストコードの中で一番良かったのは以下のコードでした。
1 | import unittest |
実は、上記のテストコードには続きがあり、 test_add_pet_with_transaction_failure というテストケースが定義されていました。
ただ、トークン数の上限に達し、コード生成が途中で終了していました。
参考までに、その内容は以下の通りです。
1 | def test_add_pet_with_transaction_failure(self): |
おそらく、この後に self.assertEqual(pets[0], pets[1]) が続くと考えられますし、テストコードとしては一応成立してはいますが、不完全である可能性があるため、本検証においては本テストケースを除外しました。
評価
テストコードをテストするテストコードを書いても仕方ないので、テストコードのレビューを人が行う形式で評価します。
良い点
- プロンプトでの指示通りに生成されている点:
unittestモジュールおよびそのpatchを使用している。- テストデータを用意している。
test_find_petsのlimit = 10など、想定に基づくアレンジが加えられている。assert_called_once_withを使い、的確に spy を使用している。- シーケンス図の内容とテストケースの内容が合致している。
unittest.TestCaseを継承させたりsetUp関数を使ったりと、unittestモジュールを的確に使用している。- AAA (Arrange-Act-Assert) パターンを使用している。
- 記法が Python でメジャーなものとなっている (スネークケースの命名やスペース 4個のインデント等)。
改善点
- プロンプトでの指示通りになっていない点:
- クラス図が一部しか考慮されていない。
- OpenAPI 仕様が考慮されていないかもしれない。
- テストダブルとしてクラスが定義されているが、これはほぼ実装コードである。テストコードだけあればよく、ここまでは求めていない。また、実装コードに対するテストコードとしては、このままでは使えない。実装コードとしても、変数のスコープの関係から、そのまま流用はできない。
- 各所のコメントについて、記述内容を鑑みるに、これらは不要である。
datetime等の値が datetime ではない。- テストケースとしては足りていない。プロンプトで渡す情報を精緻化することで、テストケースも精緻化され、網羅的になることを期待。
- トークン数制限を超過してしまった。
補足
text-davinci-003 以外に、 code-davinci-002 と gpt-35-turbo のモデルでも生成を試みました。code-davinci-002 はプロンプトの読解力で text-davinci-003 に大きく劣る感触で、その出力は採用しませんでした。gpt-35-turbo はチャットで使われていることもあるためか、コメント行が大変おしゃべりです。そして、import unittest していなかったり、クラスを使用していなかったりと、テストコードとしてはいまいちでした。
まとめ
Azure OpenAI Service を使ってドキュメント (OpenAPI 仕様, PlantUML のシーケンス図およびクラス図) からテストコードを生成し、その内容を評価しました。
個人的には期待以上のアウトプットが得られたと感じていますが、しかしながらまだ「コードスニペット」としての用途にしか使えないと評価しています。
プロンプトをチューニングしたりドキュメントを精緻化することでより良い結果が出てくることが期待されますが、本検証で問題となったように、トークン数制限に容易に到達してしまうことが想定されます。
今回使用したモデルよりも GPT-4 の方がトークン数制限が緩いので、トークン数制限はサービスの発展とともに解消されると思われます。
とはいえ、職業プログラマとしてはテストコードだけでなくドキュメントも作成するものなので、ドキュメントからこれだけの「コードスニペット」が生成されるだけでも、価値はあるのではないでしょうか。